Saturday, 26 June 2010

Cheese tarts

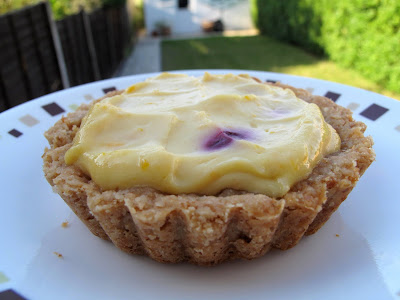
I'm not sure what exactly to call these. They're cheesecakes made in a tart form so they're either cheesecake tarts or cheese tarts. The best part of these tarts - the crust layer is as thick as the cheese layer. I'm not too fond of a cheesecake where there's way more cheese than crust. The dough for the crust isn't really a dough. It looked more like breadcrumbs. No rolling out was required - just pressing it into the tin. They did puff up a bit in the oven and when they came out, I used a fork to press the puffy bits down. It's all good.
The bf got me some tart tins a while back and they're amazing! All 6 cheese tarts slid right off the tin with hardly any effort required but to be fair, I did butter them quite a fair bit.

I made a mistake whilst making these. I put the fruit (frozen cherries and blueberries) in the tarts before pouring the cheese layer on. Note to self - cheese layer first, then fruits on top. I'll try using mascarpone or a gelatine cheese recipe next time.

Again, I can't remember where I got this recipe from.

Cheese tarts
makes six 4 inch tarts

Crust layer

6 oz butter
1/4 cup brown sugar
1 Tbsp white sugar
2 heaped tsp honey
1 1/4 cup flour
1/4 cup wholewheat flour
1/2 tsp salt
1/2 tsp cinnamon

1. Preheat oven to 170 C. Butter tins.
2. Cream butter and sugars till light and fluffy.
3. Add in flours, salt, cinnamon and honey.
4. Mixture will appear to be crumbly. Press into buttered tins.
5. Place tart tins onto a baking sheet and bake for 18 minutes.

Cheese layer

8 oz cream cheese (room temperature)
2 Tbsp caster sugar
1 egg
zest of an orange
1/2 Tbsp orange juice
1/2 Tbsp flour

1. Using a mixer, mix cheese and sugar till smooth and creamy. Add in all other ingredients.
2. Pour cheese mixture into baked crusts and arrange fruit.
3. Bake in a preheated 170 C oven for 15 minutes.

Wednesday, 23 June 2010

Sweet potato bundt cake

This cake is delicious! Who would have thought - making a cake out of sweet potato. It has a tiny hint of sweet potato flavour and it goes perfectly with cinnamon. I just made this cake this afternoon and it's really easy to make. A mixer isn't even required.
I had many slices whilst it was still warm and it has a lovely/interesting texture especially when you bite into a walnut. It goes perfectly with vanilla ice cream too. I can't remember where I got this recipe from but it is modified from a couple recipes.

I sliced a medium sized sweet potato (~700g pre-cooked) into chunks and boiled them till soft (i.e. easily pierced by a fork) and mashed it up. Set it aside and leave to cool before using it.

Sweet potato bundt cake
makes one 9 to 10 inch bundt cake

2 cups mashed sweet potato (leave to cool - I used it when it was a bit warm)
1 cup oil
4 eggs

2 3/4 cups all purpose flour
1 tsp salt
1 tsp baking soda
1 tsp baking powder
1/2 cup caster sugar
1 cup brown sugar
2 tsp cinnamon

1 cup chopped raw walnuts

1. Preheat oven to 170 C. Butter and flour the bundt pan.
2. In a large bowl, sift the flour, salt, baking soda, baking powder and cinnamon. Mix in both the sugars.
3. In a separate bowl, mix together the sweet potato, eggs and oil.
4. Pour the wet ingredients into the dry ingredients and mix till combined.
5. Stir in the walnuts.
6. Pour batter into prepared pan and bake for 55-60 minutes or until a thin knife inserted into the centre of the cake comes out clean.
7. Transfer the cake to a rack and cool for 10 minutes before unmolding onto the rack to cool to room temperature.

Monday, 21 June 2010

THE Wedding cake

Yay! Wedding cake is completed! Congrats to the married couple. From now on - random miscellaneous baking. Looking forward to baking tarts and cheesecakes. I can't believe that the cake/cupcakes actually turned out. Actually, good thing it did turn out.
The fresh roses were poked into the leftover fondant which was rolled into a flat disc and they pretty much lasted through the day. Anyways, I'm going to leave this post as a short one.

*edited*

I just realised that I don't have any clean pictures of the cake because we assembled it at the restaurant! What a bummer.
Due to the lack of space, I started moving the cupcakes etc onto the living room table. The kitchen and living room table were pretty much out of bound areas to everyone else.

Wednesday, 16 June 2010

Wedding cake v3.0

Wedding cake v3.0!! The cake that has scored the most marks so far (compared to v1.0 and v2.0). Tomorrow is the real thing! THE wedding cake! Plus all the little cupcakes that will sit on the other tiers. Hope everything goes as planned and that nothing goes horribly wrong. Not that there is a detailed plan - just bake the 3 layers, bake the cupcakes and decorate the cake. Frosting the cupcakes shall be left to be done on Friday.

THE wedding cake won't look exactly like the above. It isn't going to have a red strip of paper from a magazine going around the cake and roses which were "borrowed" from the neighbour's garden on the top. I think I've got the ribbon and flowers technically covered.
The cake is pretty much the same as wedding cake v2.0 except that I put orange zest in it and a layer of strawberry jam on both sides of the chocolate layer. The zest and the jam makes the cake so fragrant when you slice it. The jam also adds the specs of red. Aww, it looks so pretty! Anyways, fingers crossed for tomorrows mission - THE wedding cake.

Tuesday, 15 June 2010

Orange zest cupcakes with vanilla frosting

I used the same recipe as the lemon zest cupcakes. I just substituted the lemon zest with orange zest. These cupcakes would essentially be vanilla cupcakes v4.0. I think I'll be laying off the wedding cake recipe and the vanilla cupcakes for a bit. I've actually been itching to bake a cheesecake or a tart of some sort.
I tried frosting them using another method but easier said than done. Think I'm just going to stick with the standard - well, the above method. Piping starting from the centre and ending on the outside. I definitely envy the people who post videos on the simplicity of piping or frosting a cupcake. They make it look so easy! And from what I've tried, it isn't.

Monday, 14 June 2010

Wedding cake v2.0

Wedding cake v2.0. Same look, different recipe from wedding cake v1.0. I used the same recipe for the chocolate layer as the last time but for the vanilla layer, I tried the standard victoria sponge cake recipe where it's the 1:1:1:1 ratio of flour:butter:sugar:eggs. I think. Actually, I think I did cut down on the sugar. The vanilla layer wasn't as nice compared to the last time. It was really eggy and not as light.
I did make more frosting this time compared to the last time and put much more compared to the last time. Turned out way better and I used 1kg of fondant as opposed to 1/2kg the last time. It made such a difference. I actually had enough fondant this time to cover the cake plus a bit extra to make winnie the pooh & friends cut outs.

I did better than the last time but v3.0 should be coming soon.

Friday, 11 June 2010

Caramel nuts

Sugary goodness. You can't really go wrong when it comes to sugar and nuts. This makes a really good snack especially when you're craving something sweet. I just partially roasted some raw nuts - cashewnuts, walnuts and almonds and baked them with sugar, honey, salt and a touch of butter. I don't really have a recipe for this. Just the pre mentioned ingredients in a pan and boil till it bubbles. Add the nuts and bake in a 160 C oven for 10-15 minutes. Basically before it starts to burn.
I really need to remember to sprinkle salt on it after it's done. It makes such a difference but I keep forgetting to do so. My bad.
On a separate note, the flowers here are so pretty and to think most of them are considered as weeds. Aww, they're so pretty and photogenic. Ooh, it's suddenly sunny outside. The weather has been pretty rubbish for the past couple days. It's pretty much either cloudy or drizzling literally the whole day. Oh, and it's cold too. It feels weird that I'm not ending this post with a recipe. Oh well.

Thursday, 10 June 2010

Monkey bread

This bread is amazing and so easy to make! And I love how the whole house smells of cinnamon whilst the bread is baking in the oven. Mmm. We ate them whilst they were still warm and nearly finished the entire thing!
I used Martha Stewart's recipe and didn't bother with the icing as the sweetness level was way high as it is. I didn't add any nuts as well, I like to stick to just plain cinnamon and sugar. The recipe is really easy to make. With the kitchenaid, there wasn't much work that needed to be done. Apart from 'rolling' the dough into balls. I didn't bother with the rolling into balls. I just tore the into small bits. The most time consuming part is dipping the individual dough pieces into butter and coating them in the sugar/cinnamon mixture.
It doesn't look too appealing when they first come out of the oven but when you turn it over, the actual gooeyness of the top is so pretty! I waited about 15 minutes before turning it out. Didn't want it to cool in the pan and solidify. It came out really easily. I didn't even have to knock it. Just put a plate on the pan and turn it around.

Monkey bread from Martha Stewart
makes one bundt tin

For the dough

2 Tbsp butter, plus more for pan
1/4 cup warm water
1/4 cup caster sugar, plus a pinch for yeast
1 envelope instant yeast (mine was 7g a sachet)
3/4 cup warm milk
1 tsp salt
3 1/4 cups all purpose flour
1 large egg

For the coating
4 oz melted butter
3/4 cup light brown sugar
2 tsp ground cinnamon (I used 3 tsp)

1. Lightly coat a 10-inch Bundt pan and a medium bowl with shortening; set aside. Put the warm water and a pinch of sugar in a small bowl; sprinkle yeast over top. Stir; let the yeast soften and dissolve, about 5 minutes.
2. Place the 2 Tbsp of butter, milk, sugar, salt, and egg in the bowl of an electric mixer fitted with the dough hook.
3
. Add yeast mixture to shortening mixture, and beat to combine. Slowly add flour. Knead on medium-low, 1 minute. Transfer dough to the prepared bowl. Cover with plastic wrap, and let stand in a warm place, 20 minutes.
4. Make coating: Place melted butter in a bowl. In a second bowl, combine brown sugar and cinnamon.

5. Cut dough into 1/2-inch pieces. Roll into balls. Coat in butter, then roll in nut mixture, and place in prepared pan. Cover with plastic wrap, and let stand in a warm place until doubled in bulk, about 1 hour.

6. Preheat oven to 180 C. Bake, 30 to 35 minutes (mine took 32 minutes). Let cool in pan for 15 minutes. Invert onto a serving plate, and let cool 20 minutes more.

Wednesday, 9 June 2010

Wedding cake v1.0

Trial version 1.0 of the wedding cake. Result - FAIL! Cake wise it was delicious but decoration wise - definitely a FAIL. First mistake - not having enough buttercream frosting to cover the cake. Second mistake - not having enough fondant to cover the cake.
It does look pretty though when you slice it and have a slice view. In general, from the top view it looks okay but from the sides, just plain hideous. I suppose the top wouldn't matter too much cause I'll be covering it with fresh flowers.
I don't really like the taste of fondant. I used the already made one. It tastes not really like food, more like plastic actually. I'll definitely need a thicker layer of frosting between the cake layers.

The chocolate layer cake is from Martha Stewart (minus the frosting). Really easy recipe and it's baked in one 8 inch baking tin. The cake was too dense and heavy for my liking though. The vanilla layers were from my previous post on vanilla cupcakes. Minus the lemon zest simply because I had no lemons. I'll probably use the vanilla cupcake recipe for the chocolate layer and just add a few tablespoons of cocoa powder.

Or maybe try out a whole different recipe for all the layers because the vanilla layer did shrink from the sides and wasn't too straight.

Easy chocolate cake from Martha Stewart
makes one 8 inch cake

6 oz butter
1 cup sugar
3 large eggs
1 tsp vanilla extract
3/4 cup cocoa powder
3/4 cup all purpose flour
1/2 tsp baking powder
1/4 tsp salt
1/2 cup sour cream

1. Preheat oven to 180 C. Butter an 8-inch round cake pan; line bottom with wax paper. Butter paper; dust with cocoa powder, tapping out excess; set aside (I didn't bother with this. I just buttered the pan, didn't even line it with baking paper and had no problems removing the cake).
2. In a medium bowl, sift together cocoa, flour, baking powder, and salt; set aside. In a mixing bowl, cream butter and sugar until light and fluffy. Beat in eggs, one at a time, then beat in vanilla. Reduce speed to low. Add flour mixture alternating with sour cream, starting and ending with the flour mixture.

3. Spread batter into prepared pan. Tap pan firmly on counter top several times to force out large air bubbles. Bake until a toothpick inserted in center comes out clean, 30 to 35 minutes. (mine took 38 minutes to bake). Remove from oven, Cool 10 minutes in pan, then invert onto a wire rack to cool completely (bottom side up).


Wednesday, 2 June 2010

Sausage bun v2.0

The mini hiatus is basically cause I'm not in London at the moment. I went to Wales over the bank holiday weekend and made sausage buns. Again. I used the same recipe as the last time and apart from the different designs, taste wise it was the same. I did add a slice of cheese to a few lucky buns.
I took some pictures of the garden and the bf's parents grow vegetables! Spring onions, chives, pak choy and choi sum. It's so pretty and you get loads of vegetables. To harvest, just cut it (not pull it out) and it regrows after a while. Cool huh. Shame they don't have fruit trees. I suppose after planting the vege, there isn't much space left for trees. Plus, fruit trees take years to bear fruit.
Ok, back to the sausage buns. I shouldn't really classify it as v2.0. Since it's pretty much the same. They do look different - maybe that justifies v2.0. Anyways, I used the braiding technique for some of the buns and they look really professional! Shame some of them stuck to the baking sheet. I take full responsibility though. It was only cause I did a poor job when brushing the egg wash on and it dripped everywhere - so some of the buns have mini holes at the bottom. Not noticeable unless you eat the bun upside down :)
I won't be baking much this week as I'll only be back in London on Monday. I have a mini assignment! How exciting. Basically back to testing out cupcake recipes for Y's wedding. Oh and have to look for a cake recipe too for her main cake. Oh and carry out a trial run. Hmm, sounds like a fair bit that needs to be done within 2 weeks. Actually, more like 10 days. There's no need to panic!!

Related Posts with Thumbnails