Friday, 7 May 2010

Almond biscotti

I always thought that making your own biscotti involved tonnes of work when to be honest, it involves a bit of work and a lot of waiting around. The biscuits are baked three separate times; once as a log and once on each side after slicing it into individual pieces.

I used the Pistachio Biscotti Recipe by Tyler Florence and swapped the pistachios for almonds and the vanilla extract for almond extract. I did bake the individual slices for slightly longer - 8 minutes a side and some of the thicker slices were slightly moist when they came out of the oven. This happened during the final batch and I couldn't be bothered in waiting a couple minutes longer. I ended up with around 36 biscottis but I suppose this really varies with the size of the biscottis.
I felt they turned out quite well - crunchy, hard but not too hard that you worry you might chip a tooth on it, not too sweet and not too overwhelmingly almond-y.

Will definitely be making different flavours next time. Y wanted to dip some of the biscuits in chocolate but seeing that they were made at night and I was getting impatient with the final batch, just the thought of having to melt the chocolate and wash up didn't appeal to me.

Almond biscotti
adapted from Tyler Florence
makes 36 biscottis

4 oz butter
1 cup sugar
3 eggs
1/2 tsp almond extract
3 1/2 cups flour
1 tsp baking powder
1/2 tsp salt

1 1/2 cups roasted almond

1. In a preheated 180 C oven, lay the almonds on a baking sheet in a single layer and bake for 8-10 minutes or until the nuts are lightly toasted. Leave to cool.
2. Beat the butter until light and fluffy. Gradually add the eggs, sugar and almond extract. Mix until creamed.
3. Add the flour, baking powder and salt. Mix the dough until smooth. Mix in the almonds until evenly distributed. (I did all the mixing with a wooden spoon and kneaded the almonds in)
4. Put the dough on a lightly floured surface and cut in half. Roll each half into a log, each 12 inches long by 1-inch high. Place the logs on an ungreased cookie sheet and bake for 35 minutes or until the bottoms are lightly brown.
5. Let the logs cool for 5 minutes and then place on a cutting board. Slice each log on a diagonal into 1-inch thick pieces. Put the cookies back on the cookie sheet and bake 5 minutes. Turn the cookies over and bake the other side for another 5 minutes. Store cookies in an airtight container. (I baked mine for 8 minutes a side)

Wednesday, 5 May 2010

Lemon bundt cake

I know there's a slight obsession with the bundt tin but the cakes turn out so pretty. The only problem is most cake recipes use butter and due to the lack of a mixer, the thought of creaming the butter and sugar by hand puts me off. This lemon bundt cake is so easy to make - no creaming of butter involved and the texture of the cake is amazing. The cake wasn't dense and didn't have a oily feel.
As for the icing, I'm not usually a fan as it usually just makes cakes taste really sweet but for some reason, I did end up drizzling icing on the cake and it added a pleasant crunchy texture to the cake. I did cut down on the sugar for the icing and ended up with a really runny consistency. Will definitely try next time to use the amount of sugar for the icing as per the recipe.
Lemon bundt cake
makes one 9 to 10 inch bundt cake

2 1/2 cup flour
1 1/2 cup sugar
2 1/2 tsp baking powder
1/2 tsp baking soda
1/4 tsp salt

1/2 cup orange juice
1/4 cup lemon juice
3/4 cup canola or safflower oil
2 tsp vanilla
4 eggs

Icing
1 3/4 cup powdered sugar
1/2 cup lemon juice

1. Preheat oven to 170 C. Butter and flour the bundt pan.
2. In a large bowl, combine flour, sugar, baking powder and soda, salt, orange juice, lemon juice, oil, vanilla and eggs. Beat well until combined.
3. Pour batter into prepared pan and bake for 40-50 minutes until dark golden brown.
4. While cake is in oven, combine powdered sugar and 1/2 cup lemon juice and whisk to blend. Remove cake from oven, beat powdered sugar mixture again, and carefully spoon 1/2 of the lemon and powdered sugar mixture over cake. Loosen edges of cake and turn out onto serving plate. Slowly drizzle remaining lemon mixture over cake. Let cool.

Tuesday, 4 May 2010

Garlic buns

I really like using milk instead of water when making buns/bread. The result is a soft and fluffy texture. Even the next day - just pop the bun into the microwave for a couple seconds the next day and tadaa, a warm, soft and fluffy bun.

I didn't have any form of parsley, fresh or dry in the house so I didn't bother with it. Though it would've looked nicer with the parsley like on happyhomebaking. I used the recipe from her site and I have to admit that hers look much better than mine. That's not the reason for the lack of pictures though. It's mainly cause making bread is such a messy affair and my hands seemed to be covered in dough most of the time.
It felt a bit odd using 1/2 tsp of yeast and 200g of flour for this recipe. I ended up with a small piece of dough and it either didn't rise much or I'm just not use to looking at a smaller piece of dough.

I don't have a bread machine and did the kneading by hand. Mixing in the butter was such a challenge. Initially, I was worried that the butter wasn't going to get incorporated. Then I had to add additional flour cause the dough was getting really sticky. Despite this, I only ended up with 5 buns instead of 6.

Here's the recipe as per happyhomebaking's recipe.

Garlic buns
makes 6 buns

150g bread flour
50g cake flour
15g caster sugar
1/4 tsp salt
1/2 tsp instant yeast
130g milk
15g unsalted butter

filling:
30g butter, soften room temperature
2 cloves of garlic finely chopped)
1 tsp dried parsley

1. Place all ingredients except the butter in the pan of the bread machine (according to the sequence as stated in the instruction manual of your bread machine). Select the Dough function of the bread machine and press start. After about 8mins of kneading (the ingredients should form a smooth dough by now), add in the 15g of butter. Let the machine continue to knead the dough. After the kneading cycle has stopped (20mins), Stop and Restart the machine. Continue to let the machine knead for another 10mins.
2. Stop the machine and remove dough from the bread pan. Shape the dough into a smooth round and place in a mixing bowl, cover with cling wrap and let it rise till double in volume for about 80mins.
3. Remove dough and give a few light kneading on a lightly floured work surface. Press out the trapped air as your knead. Divide into 6 equal portions and shape into balls. Cover with cling wrap, let the doughs rest for 15mins.
4. Flatten each dough into a round disc. Roll up Swiss roll style and pinch the seams in place. Roll the dough on work surface to shape it into a longish oval shape or torpedo shape.
5. Place doughs seams side down on a baking tray, lined with parchment paper. Loosely cover with a damp cloth or cling wrap and let dough proof for 30mins.
6. Prepare filling by mixing butter, garlic and parsley to form a smooth paste.
7. Brush each dough with egg wash. With a sharp knife, make a slit lengthwise on each dough. Pipe fillings on each slit.
8. Bake at preheated oven at 180 C for about 12-15 mins. Remove from oven and let cool on wire rack.

Thursday, 29 April 2010

Banana bundt cake

I'm still obsessed with the bundt tin! The cakes that come out are so pretty! I'm actually surprised that the cakes don't stick to the pan are just slide out really easily. Hope I just didn't jinx myself. I made banana bundt cake using Dorie Greenspan's recipe taken from slowlikehoney. Most people say that banana cakes are better on the second day but I had a slice about an hour after the cake came out of the oven and it's so moist!

The banana cake is so solid and heavy! I couldn't help but weigh it and it's nearly 2kg! Definitely need to get mini bundt tins. It's funny how you get dark specs in the cake from the banana - makes it look so pretty!
I followed the recipe and even used sour cream. I have never used sour cream in baking and was debating on whether I should replace the sour cream with yogurt. I'm not a fan of sour cream apart from sour cream and chives flavoured crisps and biscuits. Actually, the reason why I used sour cream is cause yogurt comes in 500g and sour cream in 300g. I didn't want any leftovers so I just used the entire pot of sour cream.
I added slightly less than the 1 1/2 cups of sugar. Think I'll cut down the sugar by a 1/4 cup next time. I also used about 2 cups of mashed up banana. The cake was browning really quickly and after about 35 minutes, I covered the cake in the oven with a piece of foil. Mine took about 65 minutes to bake.

Banana bundt cake
makes one 9 to 10 inch bundt cake

3 cups all-purpose flour
2 tsp baking soda
1/2 tsp salt
8 oz butter, at room temperature
1 1/2 cups sugar
2 tsp pure vanilla extract
2 large eggs, at room temperature
4 very ripe bananas, mashed (should make 1 1/2 – 1 3/4 cups)
1 cup sour cream

1. Center a rack in the oven and preheat to 180 C. Generously butter and flour a 9- to 10-inch (12 cup) bundt pan. (If you use a silicone bundt pan there’s no need to butter it.) Don’t place the pan on a baking sheet – you want the oven’s heat to circulate through the bundt’s inner tube.
2. Whisk together the flour, salt and baking soda.
3. Beat the butter until creamy. Add the sugar and beat till pale and fluffy.
4. Beat in the vanilla and add the eggs one at a time, beating for about 1 minute after each egg goes in. Reduce the mixer speed to low and mix in the bananas. Finally, mix in half the dry ingredients (don’t be disturbed when the batter curdles), all the sour cream and then the rest of the flour mixture.
5. Pour batter into the pan and rap the pan on the counter to debubble the batter and smooth the top.
6. Bake for 65 to 75 minutes or until a thin knife inserted into the centre of the cake comes out clean. Check the cake after about 30 minutes and if it's browning too quickly, cover loosely with a foil tent.
7. Transfer the cake to a rack and cool for 10 minutes before unmolding onto the rack to cool to room temperature.

Wednesday, 28 April 2010

Peanut butter bars

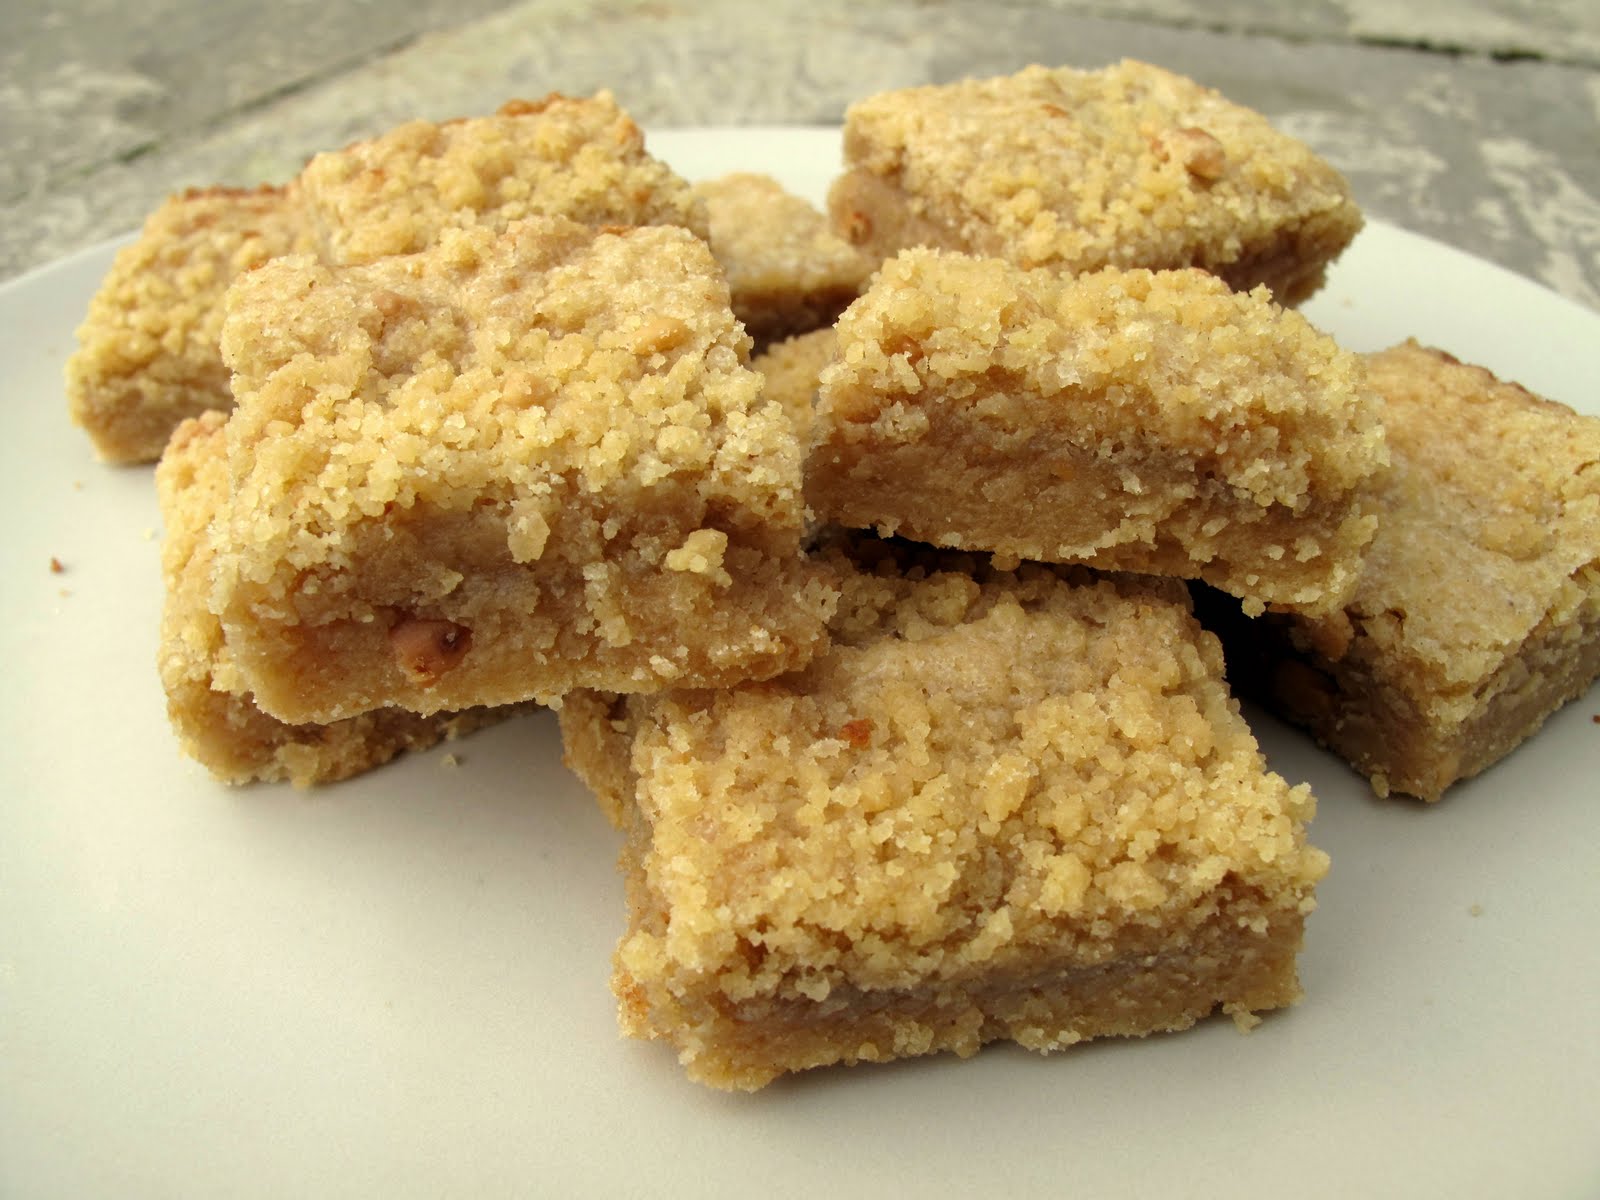
These peanut butter bars are a huge YUMM. I did overdose on them and regretted eating too many of them later on but thinking back it was totally worth it! The recipe from cooking on the side called for a 13x9 inch tin. I used a 9x9 inch tin just because I don't have a 13x9 inch tin and I prefer a thicker base. The slices look deceivingly tall but they're less than an inch high.
The bars turned out really rich, dense and fudgy. Very peanut buttery! Definitely recommend this recipe but only if you have backup when it comes to eating them. Will definitely make a different variation of this! Probably with a banana and jam filling. I cut down a fair bit on the sugar. I used a cup of sugar for the base and 1/2 a cup of sugar for the filling.

Peanut Butter Bars

makes one 9 inch cake

Crust

1/2 cup soft butter
1/2 cup peanut butter (smooth or chunky)
1 1/2 cups granulated sugar
1/2 teaspoon vanilla extract
1 1/2 cups all-purpose flour

Filling

2 eggs
2 tablespoons peanut butter (smooth or chunky)
1/2 cup granulated sugar
1/2 cup packed brown sugar

1. Preheat oven to 185 C.
2. Mix butter, peanut butter and sugar. Stir in vanilla. Add flour and mix well. Reserve a cup of this mixture for the top.
3. Firmly press remaining mixture into bottom of greased baking pan.
4. Beat eggs, peanut butter and sugar together. Spread over unbaked crust. Sprinkle with reserved crust mixture. Bake for 20 minutes or until set and top is golden. Cool in pan and cut into bars.

Tuesday, 27 April 2010

Mocha walnut marbled bundt cake


Y went to Oxford over the weekend and came back with a very pretty looking bundt tin! I was worried about the cake sticking to the tin but after a generous butter and flouring, it popped out effortlessly.

I'm not part of the Tuesdays with Dorie's baking group but after looking at the pictures of their cakes, I just had to make her Mocha walnut marbled bundt cake. I got the recipe from the pastry brush's site. Note to self - the top of the cake turns out to be the bottom of the cake. That slipped my mine when I was doing the swirly marbled pattern on the cake. When it came to unmolding the cake, I got really excited by the pretty bundt tin pattern but it was only when I was taking pictures that I realised there was no marble-y pattern on the top of the cake. At least there's a pretty chocolate wave at the side of the cake.
The recipe was straight forward and easy to follow. I was a bit disappointed with this cake. The cake was a bit on the heavy side.
Mocha walnut marbled bundt cake
makes one 9 or 10 inch bundt cake

2 1/4 cups flour
1/2 cup finely ground walnuts
1 tsp baking powder
1 tsp salt

8 oz + 1 oz butter (9 oz in total)
1 3/4 cups sugar
4 eggs
3 oz coarsely chopped bittersweet chocolate
1 tsp instant coffee
1/4 cup coffee
2 tsp vanilla
1 cup whole milk

1. Centre a rack in the oven and preheat the oven to 180 C. Butter the bundt pan, dust the inside with flour and tap out the excess. (If you’ve got a silicone bundt pan, there’s no need to butter or flour it.) Don’t place the pan on a baking sheet – you want the oven’s heat to circulate through the bundt’s inner tube.
2. Whisk together the flour, ground walnuts, baking powder, and salt.
3. Set a heatproof bowl over a saucepan of gently simmering water. Put 1 oz (2 Tbsp) of the butter, along with the chocolate, coffee and instant coffee. Heat the mixture, stirring often, until the butter and chocolate are melted and everything is smooth and creamy – keep the heat low so that the butter and chocolate don’t separate. Remove the bowl from the heat.
4. Working with a stand mixer, preferably with a paddle attachment or with a hand mixer in a large bowl, beat the remaining 8 oz of butter and the sugar at medium speed for about 3 minutes – you’ll have a thick paste; this won’t be light and fluffy. Beat in the eggs one by one, beating well after each addition. The mixture should look smooth and satiny. Beat in the vanilla extract. Reduce the mixer speed to low and add the dry ingredients and the milk alternately, adding the dry mixture in 3 portions and the milk in 2 (begin and end with the dry ingredients).
5. Scrape a little less than half of the batter into the bowl with the melted chocolate and, using a rubber spatula, stir to blend thoroughly.
6. If you want to go for the gingko pattern, scrape all of the white batter into the pan and top with the chocolate. If you want a more marbled pattern, alternate spoonfuls of light and dark batter in the pan. When all the batter is in the pan, swirl a table knife sparingly through the batters to marble them. (I used a chopstick to make the swirl pattern).
7. Bake for 65 to 70 minutes, or until a thin knife inserted deep into the center of the cake comes out clean. Transfer the bundt pan to a rack and let cool for 10 minutes before unmolding, then cool the cake completely on the rack. (Mine took 60 minutes to bake).

Monday, 26 April 2010

Blondies

Saturday was such a sunny day in London. I actually found it warm and didn't have to wear a second layer for once. Sunday on the other hand was wet and gloomy. This was a random bake during the day just because I was stuck indoors. I usually bake in the morning when everyone else is sleeping in cause I'm an early riser.

I used this recipe from Mike Lesiuk as the ingredients were simple and it used melted butter so no creaming of butter and sugar by hand required. The only difference I made was I cut down the sugar and used 3/4 cup and I added 1/2 tsp of baking powder. Simply because I prefer a cakey cake to a fudgy one.

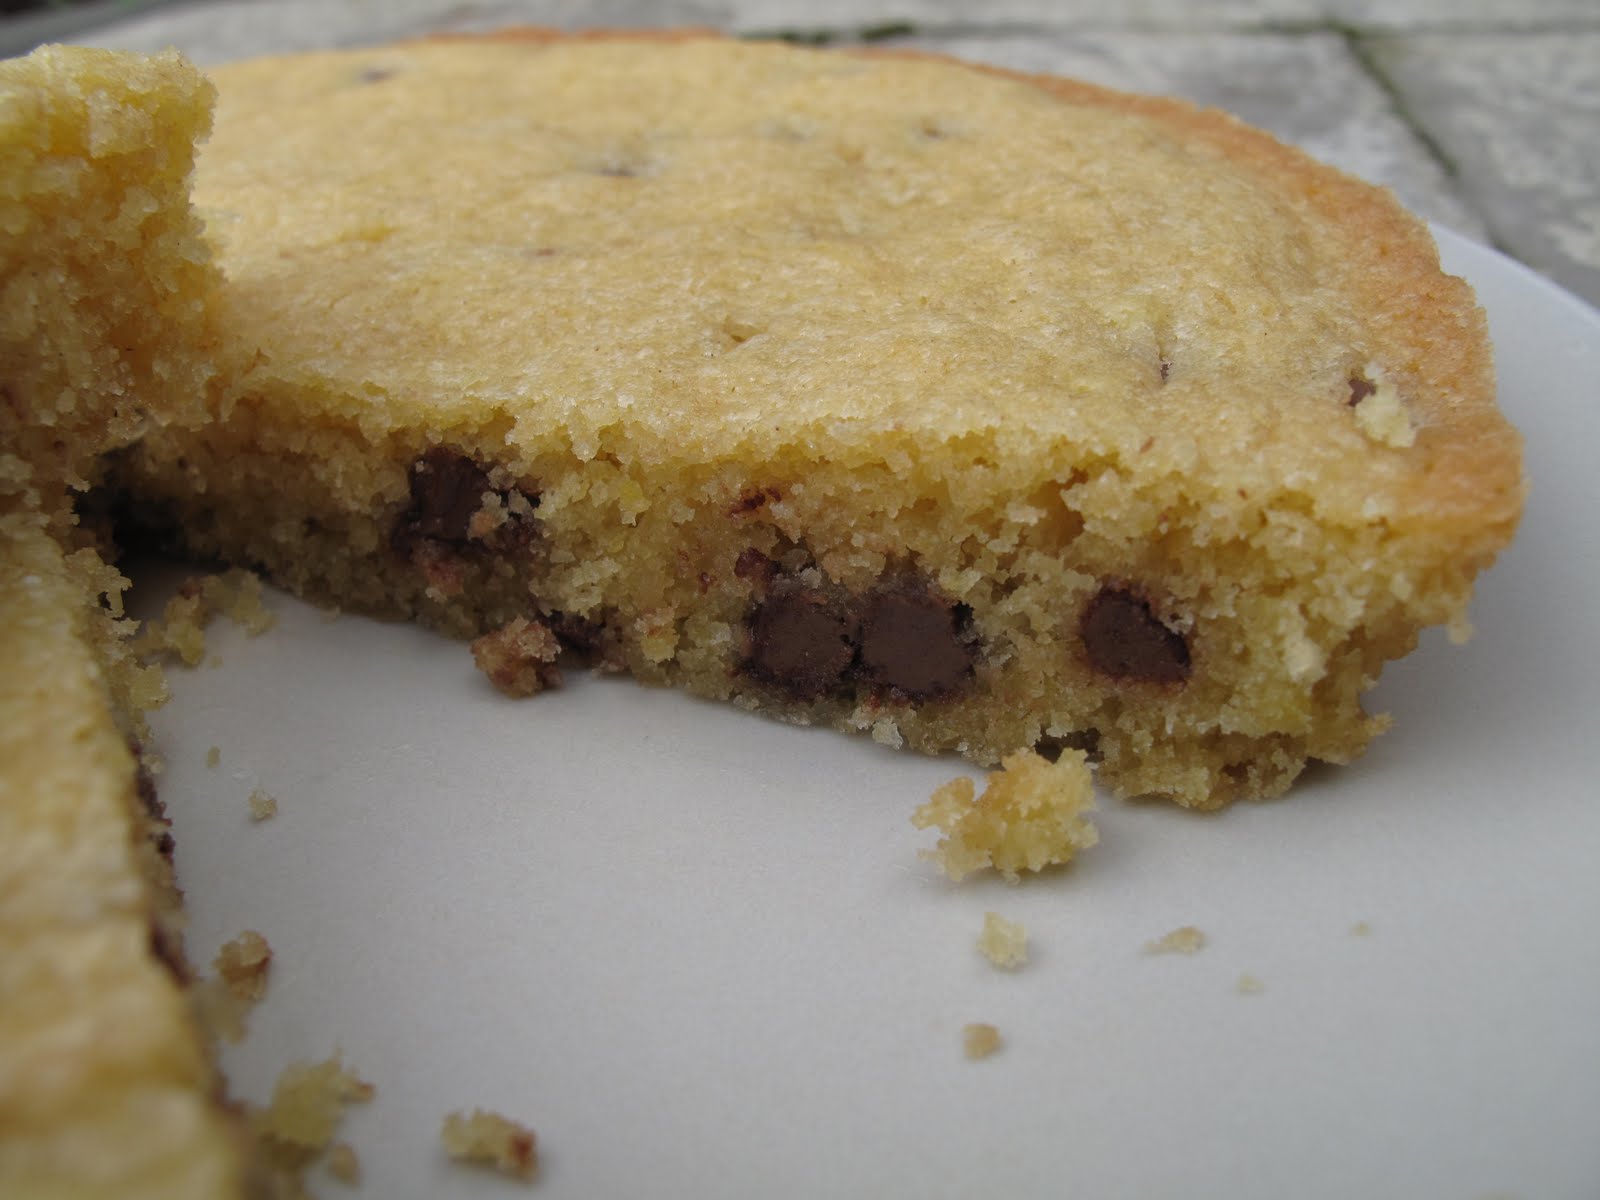
The batter looked like a softer version of chocolate chip dough. I overbaked the blondie. I think I left it in there for 25 minutes. This is what happens when you don't have a timer and you rely on checking the clock every few minutes. And on top of that, I always forget the time I put the cake in oven in the first place.
The blondie is nearly finished with little help from anyone else. To be fair, the blondie is fairly short; it IS half the height of a normal cake.
Blondies
makes one 8 inch cake

4 oz melted butter
3/4 cup brown sugar
1 egg
1 tsp vanilla
1/4 tsp salt
1 cup flour
1/2 tsp baking powder
1/2 cup chocolate chips

1. Mix melted butter and sugar.
2. Mix in egg. Then vanilla.
3. Sift in salt, baking powder and flour.
4. Mix in chocolate chips.
5. Bake in a preheated oven at 180 C for 20-22 minutes.
Related Posts with Thumbnails